REVIEW · COPENHAGEN
Copenhagen City Of Lights PhotoWalks Tour
Book on Viator →Operated by Better Moments Photo Exploring · Bookable on Viator
The lights come on, and the city changes fast. You’ll get a private pro photographer guide and you’ll capture Nyhavn’s lights right when the mood flips from evening glow to night magic. The one catch: you’ll want a tripod, because longer exposures are part of the plan.
I like that this isn’t just a sightseeing walk with a camera strapped on. It’s a photography lesson in motion, focused on composition, exposure, and how to use the light you’re seeing, not some imaginary “perfect” setting. And because it’s private, the guide can slow down for you and your camera, even if you’re new.
Copenhagen’s light can be tricky—sometimes it stays bright longer than you expect—so don’t plan on seeing a pitch-dark city. If you show up ready to learn how to work with that softer illumination, you’ll get a lot more out of the experience.
In This Review
- Key points worth knowing before you go
- Copenhagen’s Blue Hour to Night Window: Why This Timing Matters
- Private PhotoWalks With a Pro: What “Exclusive” Really Feels Like
- Memorial Anchor to Kongens Nytorv: A Night Walk That Loops Back
- Nyhavn at Night: Old Houses, Reflections, and Real Photo Opportunities
- The Queen’s Palace Area and Nearby Civic Views: Shooting Power and Symmetry
- Opera House and Parliament: Learning to Photograph Bright Lighting Without Losing Detail
- The Photography Lesson You Actually Use: Settings, Composition, and Long Exposures
- Tripod, Clothing, and Camera Prep for All-Weather Copenhagen
- Price and Value: What $233.63 Buys in Real Time
- Who This Tour Fits Best (and Who Might Skip It)
- Should You Book Copenhagen City of Lights PhotoWalks?
- FAQ
- How long is the Copenhagen City of Lights PhotoWalks tour?
- Is the tour private?
- What language is the tour offered in?
- Do I need a tripod?
- When is the best light covered?
- What places will we photograph?
- Does the tour run in bad weather?
- Will I get help with camera settings?
- Where do we meet and where does it end?
Key points worth knowing before you go
- Private, exclusive time with a photography instructor so you’re not competing for attention
- Blue hour to night pacing that helps you shoot multiple lighting moods in one outing
- Night photography instruction built around manual settings and long shutter speeds
- Landmark shots you’ll actually want: Nyhavn, the Queen’s palace area, the Opera House, and parliament
- Tripod required for the longer exposures that make the lights look like themselves
Copenhagen’s Blue Hour to Night Window: Why This Timing Matters
Copenhagen looks different in each step of evening, and this photo walk is built around that shift. You start just before the sun sets, while the sky still has color, then you move into the moment when city lighting takes over the scene. That transition is where photos can go from “nice view” to “how is this so cinematic?”
You’ll also get practice choosing camera settings when the light is changing every few minutes. That’s a skill you can reuse the next time you shoot a waterfront, a street with reflections, or a lit façade.
One practical note: Copenhagen can stay light longer than your usual expectations, so you may not end up with full darkness. The good news is the guide’s job is to help you make the most of the light you actually have.
You can also read our reviews of more city tours in Copenhagen
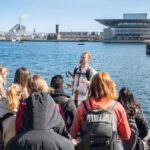
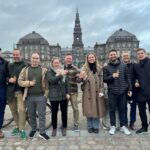
Private PhotoWalks With a Pro: What “Exclusive” Really Feels Like
This tour is private in the real sense: your guide is focused only on your group. That matters for night photography because you can’t just copy someone else’s settings and hope it works. Your camera, your lens, your tripod stability, and the exact angle of the building lights all change what you should do.
The guide helps with composition and exposure as you walk. Translation: you’ll learn what to frame, not just where to point the camera. You should also expect hands-on coaching about manual camera settings like aperture, shutter speed, and ISO.
If you’re brand-new, the pacing should feel manageable because the instructor can guide you step-by-step. If you’ve shot night scenes before, you still benefit from being corrected on real angles and real lighting conditions instead of guessing.
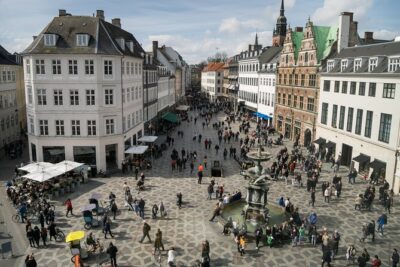
Memorial Anchor to Kongens Nytorv: A Night Walk That Loops Back
The meeting point is Memorial Anchor, Nyhavn 1F, 1051 København. That’s a smart start area because it places you close to the kind of lighting that makes night photos work: water, old façades, and street lamps all in one view.
The walk ends back near where you started, close to the Metro station at Kongens Nytorv. Looping like this keeps the logistics simple and helps you stay focused on shooting instead of chasing transit.
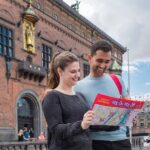
You’ll also be near public transportation throughout, which is helpful when you’re planning dinner or an evening add-on. And since the tour is offered in English with a mobile ticket, you don’t have to fuss with paperwork before you go.
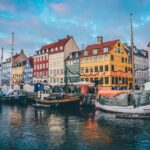
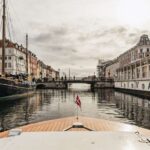
Nyhavn at Night: Old Houses, Reflections, and Real Photo Opportunities
Nyhavn is the big emotional payoff, and it’s also a technical playground. You’ll aim for the classic old houses and the way the canal lighting creates reflections that can look soft, streaky, or crisp depending on your settings.
This is where the coaching is most useful. You’ll get help with composing so the shot includes both the subject and the lines of the street lamps or canal edge. You’ll also work on exposure choices—especially when the highlights are bright but the shadows can fall off quickly.
If you’re using long shutter speeds, Nyhavn is ideal because the light sources act like “handles” for your exposure. The guide can help you balance the bright areas so the photo has mood, not just blown-out windows.
Drawback to expect here: crowds. The area is popular, and you’ll sometimes need to wait for a clear moment. The upside is that waiting becomes part of the craft—timing your shot is part of night photography.
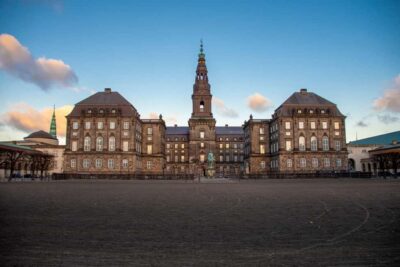
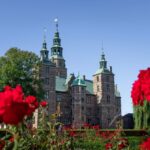
The Queen’s Palace Area and Nearby Civic Views: Shooting Power and Symmetry
After Nyhavn, you’ll move through areas tied to Copenhagen’s royal and civic presence. The tour includes the Queen’s palace area and other important landmarks, which are perfect for learning to shoot architecture at night.
Why? Because buildings give you clean geometry—perfect for composition lessons about perspective, lines, and color. At night, those same lines become more dramatic because lighting defines edges and corners.
For your photos, this kind of stop is about control. You’re not just capturing a scene; you’re shaping it. You’ll get practice aligning your frame, deciding how much sky to include, and choosing an exposure that keeps the building readable even when streetlights are strong.
Also, keep your expectations flexible. Night city lighting can make details look different than they do in daylight. The lesson here is learning how to interpret what the lights are doing.


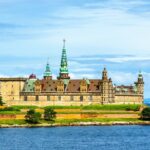
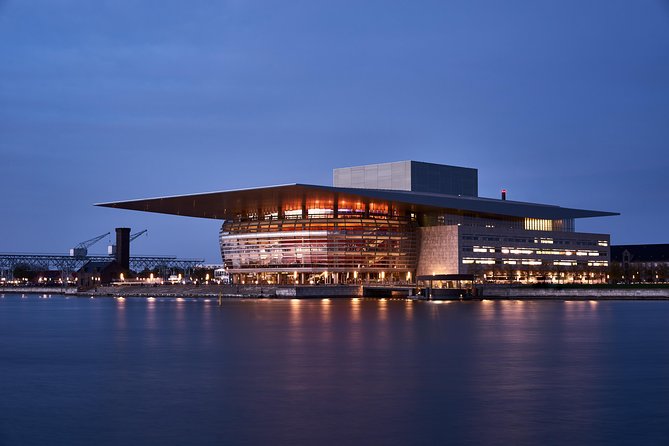
Opera House and Parliament: Learning to Photograph Bright Lighting Without Losing Detail
The Opera House and the parliament area are included stops, and they’re both “challenge photos” in a good way. Big, well-lit landmarks can tempt you to overexpose, especially when the camera’s metering tries to protect highlights.
This is exactly where having a professional photographer guide matters. You’ll work through manual camera settings rather than relying on automatic modes that may misread the scene. You’ll practice adjusting aperture, shutter speed, and ISO to keep detail where you want it—bright façades, darker sky, and everything between.
This stop also supports the idea of color control. Even when the sky fades, the street lighting adds warmth, cool tones, and mixed colors. The guide can help you use that color instead of fighting it.
If you take away one thing from these landmarks, make it this: you can’t treat every night scene like the same exposure recipe. Different brightness levels in different parts of the frame mean you need to adjust.
The Photography Lesson You Actually Use: Settings, Composition, and Long Exposures
The real value here is the instruction that directly connects to shots you’re taking. You’ll learn practical techniques you can repeat the next time you shoot a night city.
Here are the main lesson themes you should expect:
- Manual camera settings: aperture, shutter speed, ISO, and how each affects the final image
- Composition using perspective, lines, and color: framing that looks intentional, not accidental
- Control and influence of light: deciding what to include based on illumination, not just landmarks
- Long shutter speed usage: matching exposure length to the look you want
- Post-processing tips: practical advice for shaping the final image after the shoot
Long shutter speeds are the heart of night photography here. They’re also the reason you’ll need a tripod. With long exposures, even small hand movement creates blur where you don’t want it.
The guide can help you understand what long exposures do to light sources and water reflections. That’s the difference between a photo that looks like a snapshot and one that looks like you meant it.
And because this is a walk-through tour, you get to practice the skills in real time. The city keeps changing, so you learn how to make adjustments quickly—without turning your night into a “settings only” project.
Tripod, Clothing, and Camera Prep for All-Weather Copenhagen
Bring a tripod. This isn’t optional if you want to follow the longer exposure approach. Night photography is about stability, and you’ll thank yourself when you see sharper, cleaner light trails and reflections.
Weather is handled as “all conditions,” so dress appropriately. Copenhagen in the evening can be cold and damp, and your fingers will get clumsy fast if you don’t plan for it. Warm layers matter because you’ll be out walking and setting up shots.
In terms of camera readiness, arrive prepared to shoot manually. You don’t need to be a pro, but you do need to be willing to adjust aperture, shutter speed, and ISO during the session. If you bring a fully manual-capable camera, you’ll get more out of the lesson.
Also, use the time you’re given efficiently. Night photography is a moving target. Set up, shoot, evaluate, tweak, and move on—this is exactly the rhythm the guide will help you build.
Price and Value: What $233.63 Buys in Real Time
At $233.63 per person for about 3 hours, this isn’t a budget activity. The question is what you’re paying for, and the answer is your time with a photography instructor who can troubleshoot your camera and your composition as you shoot.
You’re not just paying for a route around Copenhagen. You’re paying for:
- Private instruction rather than a large group format
- A focused photography lesson tied to specific landmark scenes
- Hands-on help with settings so your photos improve during the walk, not after
The other value angle is the group setup. It’s private and exclusive, and the information says you can bring up to three friends or family members included in the price. If that applies to your booking as stated, it can make the cost feel more reasonable when split across a small group.
If you already know how to shoot night scenes and you’re comfortable with manual settings, you might get less incremental improvement. But if you want to learn, tighten up your technique, or finally get photos that look like you know what you’re doing, this format can be a smart use of your time.
Who This Tour Fits Best (and Who Might Skip It)
This experience is best for you if you:
- Want a photo lesson and not just sightseeing with a camera
- Like Copenhagen’s iconic scenery—especially Nyhavn and major landmark architecture
- Are willing to work with manual settings and long exposures
- Prefer a guide who can tailor the pace to your needs in a private setting
You might skip it if:
- You don’t want to use a tripod or you’re not interested in longer exposures
- You want a casual stroll with photos taken on automatic settings only
- You’re expecting fully dark skies the entire time without variation
If you’re traveling with a friend who also wants to learn, the private setup can be more enjoyable than a group class where you have to wait your turn.
Should You Book Copenhagen City of Lights PhotoWalks?
I’d book it if night photography is on your Copenhagen checklist and you want the “how” behind the final image. The combination of a private guide, landmark variety, and real instruction on manual settings is exactly what turns a nice night outing into a repeatable skill.
I’d think twice only if tripod use is a deal-breaker for you or if you’re hoping for a purely passive photo tour. The payoff here comes from participation—shooting, adjusting, and learning as the light changes.
If you do go, show up ready with a tripod, set expectations for mixed lighting (blue hour into night), and be open to experimenting with composition. You’ll leave with photos you actually feel proud to keep.
FAQ
How long is the Copenhagen City of Lights PhotoWalks tour?
It lasts about 3 hours.
Is the tour private?
Yes. It’s exclusive, with only your group participating.
What language is the tour offered in?
The tour is offered in English.
Do I need a tripod?
Yes. The tour requires a tripod because you’ll do longer exposures for night scenes.
When is the best light covered?
The walk is timed just before sunset, between the blue hour and when it becomes proper night, so you can shoot changing moods of light.
What places will we photograph?
You’ll have chances to photograph Nyhavn, the Queen’s palace, the Opera House, the parliament, and other important Copenhagen landmarks.
Does the tour run in bad weather?
It operates in all weather conditions, so dress appropriately.
Will I get help with camera settings?
Yes. The guide covers manual camera settings such as aperture, shutter speed, and ISO, plus composition and exposure guidance.
Where do we meet and where does it end?
You meet at Memorial Anchor, Nyhavn 1F, 1051 København. It ends back at the meeting point area, close to Kongens Nytorv Metro station.